|
Instrument
Control
Holding the instrument
One of the most important subjects of playing an instrument is the correct
playing position. Just
like with other disciplines, the foundation on which
playing skills are built decide the level of
refinement obtainable. Professionally trained musicians spend many years training and fine tuning
their
playing position and muscle control through specialized therapies like Mensendieck, Alexander
etc.. In
order to develop technical and musical
skills which will enable you to play advanced music,
you should begin with a
solid knowledge of the correct playing position.
As with all musical instruments, there are two main objectives:
- freedom of movement
- maximum control over the instrument
Standing up, or sitting
down
Most beginning concertina players prefer to sit down while playing. One
of the advantages is that
you have more control over the instrument because it
rests on your knee. The stability also allows
for more freedom of hand movement, since you don't have to lift up the concertina. On the other
hand, the arm and
hand position is not perfect in this position. The angle of the arms should be
close to 90 degrees.
Since (for most people) the torso is longer that the upper arm, the angle ends
up to be more than
90 degrees. Many players tend to correct this by slouching,
correcting the angle with their back.
A better way is to use a guitar stool
under one foot, or to cross your legs. This way the instruments
sits a little
higher, just enough to maintain a (almost) perfect arm angle.
With the exception of ensemble playing, especially on the heavier bass
concertina, the concertina is
best played standing up. This will improve the
sound projection on a stage, especially in combination
with, for instance, a (grand) piano, just as with violins, flutes, etc..
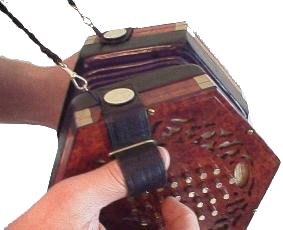
When playing in a standing position, it is advisable to use a
cord, just like they did in the 19th
century (see the back ground picture). The
use of a cord is a logical consequence of the two objectives.
It offers the same advantages as resting the instrument on you knee in the sitting position. The
arm
angle can be adjusted by the length of the cord.
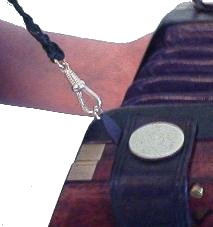
Our variation of a cord attachment: Silver hook
and ring, attached to a leather strip
(complete set $32.00, including a length of fancy cord and shipping).
order
Adjusting the thumb strap
The thumb straps are the only fixed contact with the instrument. In order to
have freedom of
movement, the thumb should not be inserted all the way, since
this will obstruct most of the
movement of the hand. The thumb should work as a hinge, enabling the hand to reach the high
notes and,
especially on tenor-trebles, also the lower notes. Therefore the thumb should be
inserted
only up to the first joint. This way the hand is free to move.
If the strap is too tight, it will interfere
with the blood circulation and will
become painful. If it is too loose, it will not give the necessary
support. One
of the consequences of this is the 'pinching' with the thumb and little finger,
in order
to obtain some control over the instrument. As a result of this, the
little finger, now necessary for
holding the instrument, will not be available
for playing. A side effect of this pinching is an increased
tension in the hand,
which will obstruct the movement of the other fingers. In other words, you'll
play a lot faster if you do not use your little finger for holding the
instrument.
Hand position
When the thumb is inserted in the thumb strap, lay your index, middle and
ring finger over the keys
and your little finger on the finger rest. Now bend
you fingers, including the little finger. The basic
fingering is; index finger
(finger 1) for row 1 and 2, middle finger (finger 2) for row 3, and ring
finger
(finger 3) for row 4. Remember, this is only the basic hand position. In more
advanced music
you will need to use all fingers, including the little finger
(finger 4) on all the rows.
Make sure not to stretch your thumb, this will obstruct the movement of the hand
muscles, and
therefore the fingers. Bending your thumb slightly will relax the
hand muscles.
The little finger (4)
is free to move over the finger rest and beyond,
especially when playing the highest or lowest notes
it will often leave the
finger rest. Make sure to keep it bend. If you stretch your little finger, it
will
force your thumb to (over) stretch which will pull your hand out of
alignment with the keys and
obstruct the movement of the hand muscles, and
therefore the fingers.
In order to be able to us
all your fingers, your arms should form one line with
the sides of the concertina.
Avoid bending your wrists too much.
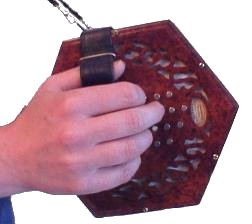
The correct hand position: Thumb slightly bend,
fingers rounded.
In this picture the little finger is being used for (chord) playing.
Pressure
points
You should always have two pressure points per hand on the instrument to
maintain control of
dynamics and tone forming. Normally these pressure points
are your thumb and little finger.
Because they are at opposite sides of the keys,
the concertina will be stable and not 'wobble'.
Later on, when you play polyphonic music (more melodies, up to 4, at the same
time) or chords,
you will be needing your little finger for playing. In that
case the wrist will take over from the little
finger. Your pressure points will
than be your thumb and wrist.
If you have problems controlling
the ends and/or bellows, you can practice with
all three pressure points (thumb, little finger and wrist).
It is also a good
pre-polyphonic exercise.
|